
This site uses cookies. By continuing to browse the site you are agreeing to our use of cookies.
How to Install phpMyAdmin with Nginx on Ubuntu 18.04 LTS
PREREQUISITES:
In order to follow this guide, you should have a server with Ubuntu 18.04.4 LTS installed with 1GB minimal memory, 10GB minimal hard drive, access to sudo privileges, Nginx, MariaDB and PHP7.4.
This tutorial will be showing you how to install phpMyAdmin with two-factor authentication using Nginx, MariaDB and PHP7.4 on Ubuntu 18.04.
I assumed that you have already installed Ubuntu 18.04 with Nginx, MariaDB and PHP7.4, if not, please check out this tutorial.
Step 1: Download and Install phpMyAdmin
The phpMyAdmin package is included in Ubuntu 18.04 software repository, so we can easily install it with the following command.
sudo apt update
sudo apt install phpmyadmin
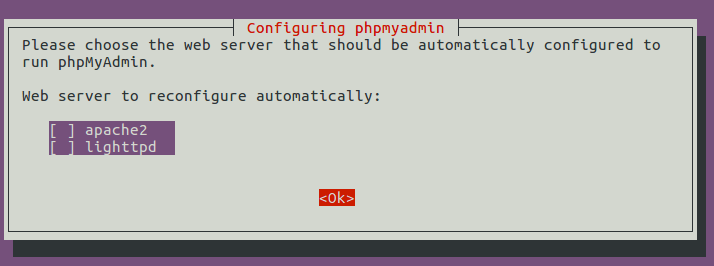
During the installation, it will prompt you to select a web server to configure. Nginx isn’t in the list, so press the Tab key and hit OK to skip this step.
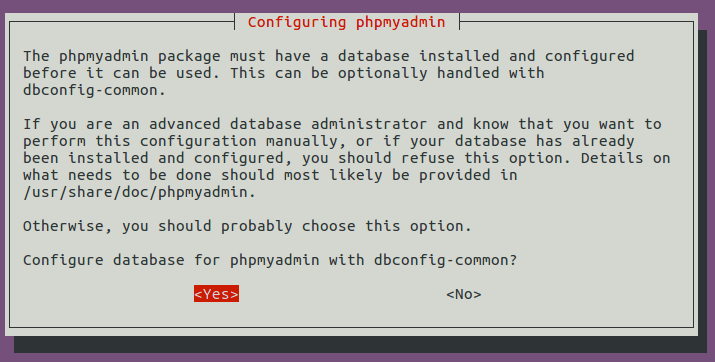
Next, select Yes to create a new database and let dbconfig-common to configure it.
Once done, a new database named PHPMyAdmin is created and the database user PHPMyAdmin has necessary privileges to manage this database. If you are curious as I am, you can log into MariaDB and check what privileges PHPMyAdmin user has been granted.
You can use the following command to log into the MariaDB server.
sudo mysql -u root
Then check the privileges.
show grants for phpmyadmin@localhost;

As you can see, user PHPMyAdmin has all privileges on database PHPMyAdmin. Now you can exit by executing:
exit;
Step 2: Create Nginx Web Server Block
To be able to access the phpMyAdmin web interface, we need to create an Nginx server block by running the following command.
sudo nano /etc/nginx/conf.d/phpmyadmin.conf
We will configure it so that we can access phpMyAdmin via a sub-domain. Paste the following text into the file. Replace pma.example.com with your actual sub-domain and don’t forget to create an A record for it.
server {
  listen 80;
  listen [::]:80;
  server_name pma.example.com;
  root /usr/share/phpmyadmin/;
  index index.php index.html index.htm index.nginx-debian.html;

  access_log /var/log/nginx/phpmyadmin_access.log;
  error_log /var/log/nginx/phpmyadmin_error.log;

  location / {
    try_files $uri $uri/ /index.php;
  }

  location ~ ^/(doc|sql|setup)/ {
    deny all;
  }

  location ~ \.php$ {
    fastcgi_pass unix:/run/php/php7.4-fpm.sock;
    fastcgi_param SCRIPT_FILENAME $document_root$fastcgi_script_name;
    include fastcgi_params;
    include snippets/fastcgi-php.conf;
  }

  location ~ /\.ht {
    deny all;
  }
}
Your phpMyAdmin files are in /usr/share/phpmyadmin/ directory. Save and close the file. Then test Nginx configurations.
sudo nginx -t
If the test is successful, reload Nginx for the changes to take effect.
sudo systemctl reload nginx
Now you should be able to access phpMyAdmin web interface via
pma.example.com
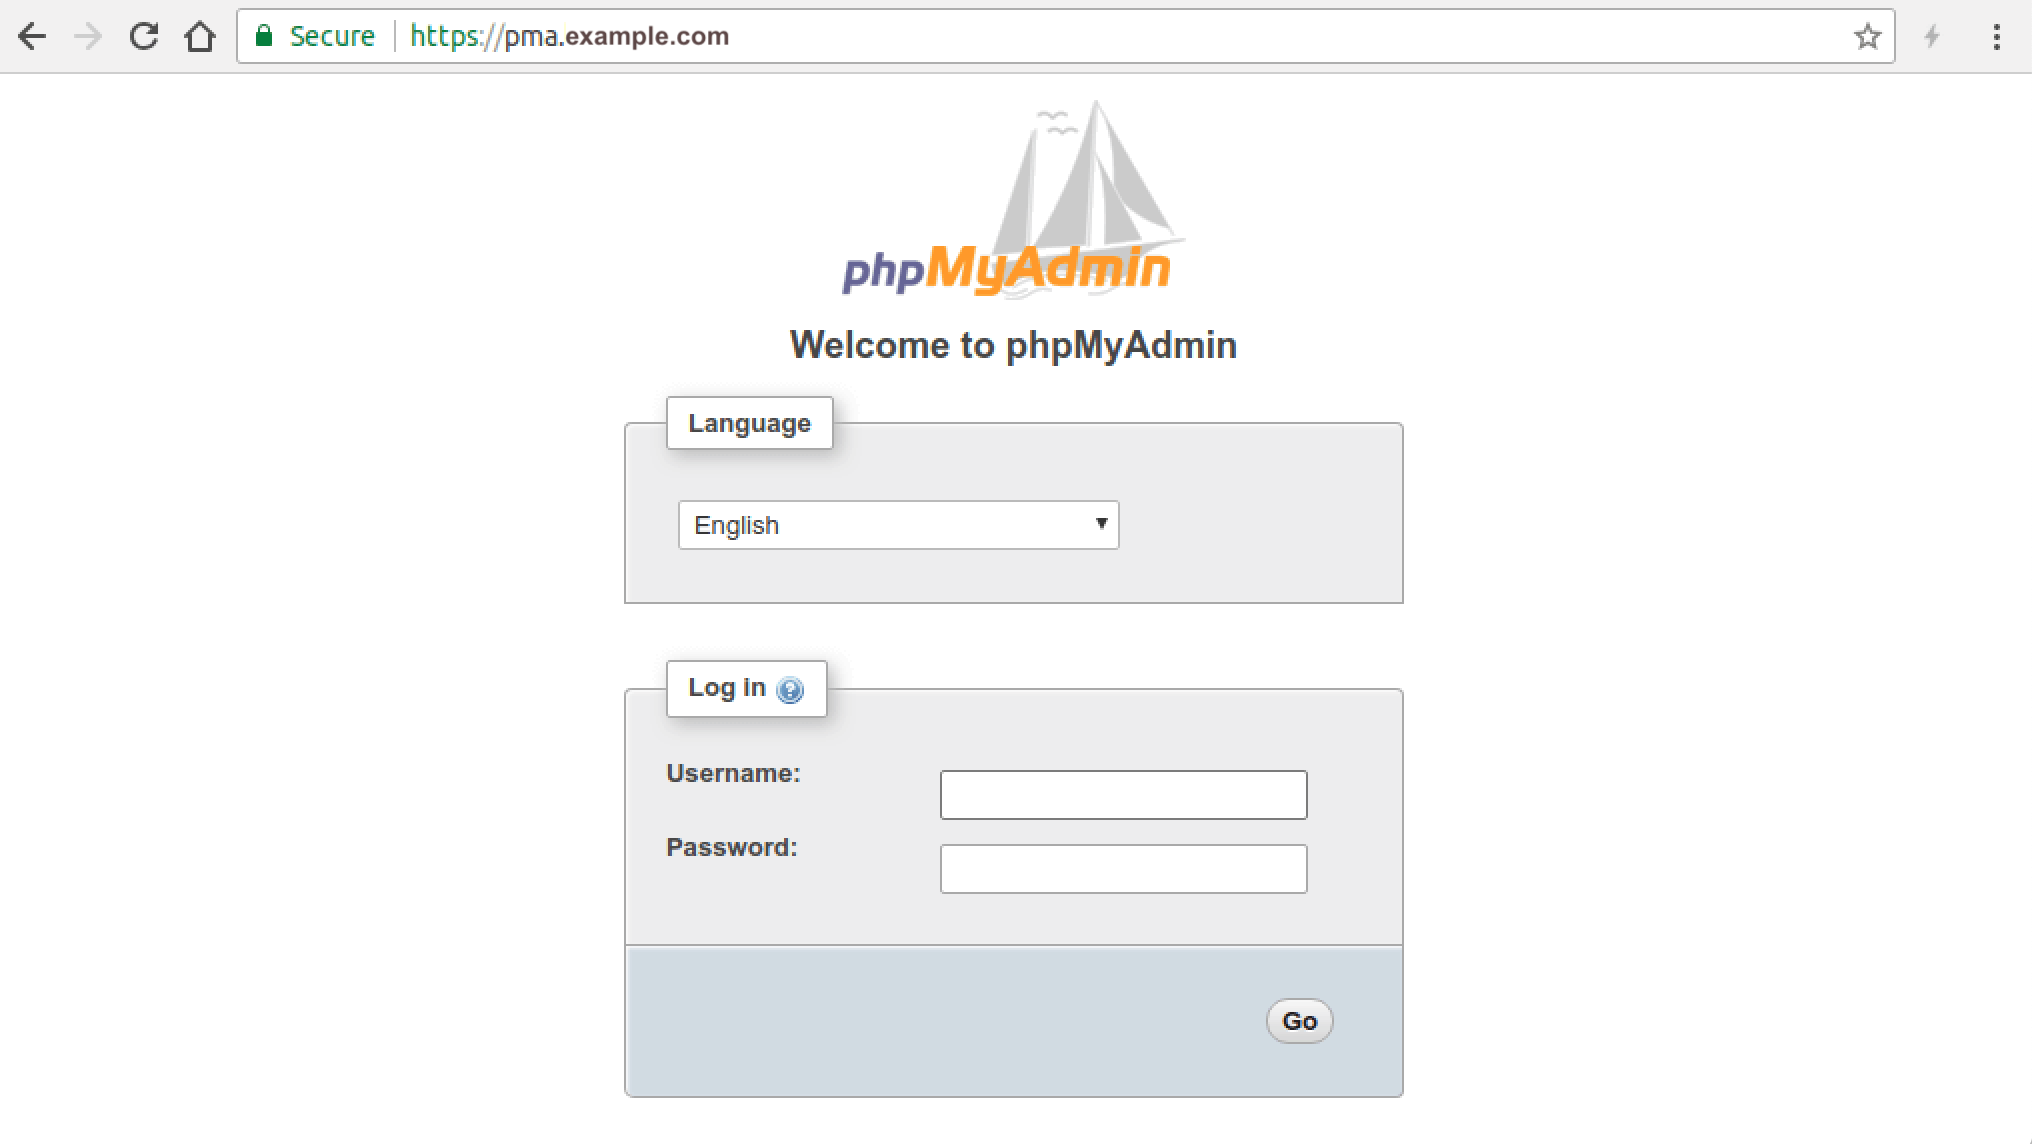
Note that phpMyAdmin will not work in recent versions of Firefox. You can use Google Chrome to visit the phpMyAdmin web interface. Before entering user credentials in the login form, let’s enable HTTPS.
Step 3: Installing TLS Certificate
To secure the PHPMyAdmin web interface, we can install a free Let’s Encrypt TLS certificate. Install the Let’s Encrypt client from Ubuntu 18.04 software repository like below:
sudo apt install certbot python3-certbot-nginx
Python3-certbot-nginx is the Nginx plugin for Certbot. Now run the following command to obtain and install TLS certificate.
sudo certbot --nginx --agree-tos --redirect --hsts --staple-ocsp --must-staple -d pma.example.com --email your-email-address
Explanation:
–nginx: Use the Nginx authenticator and installer
–agree-tos: Agree to Let’s Encrypt terms of service
–redirect: Add 301 redirect.
–hsts: Add the Strict-Transport-Security header to every HTTP response.
–staple-ocsp: Enables OCSP Stapling.
–must-staple: Adds the OCSP Must Staple extension to the certificate.
-d flag is followed by a list of domain names, separated by comma. You can add up to 100 domain names.
–email: Email used for registration and recovery contact.
You will be asked if you want to receive emails from EFF(Electronic Frontier Foundation). After choosing Y or N, your TLS certificate will be automatically obtained and configured for you.
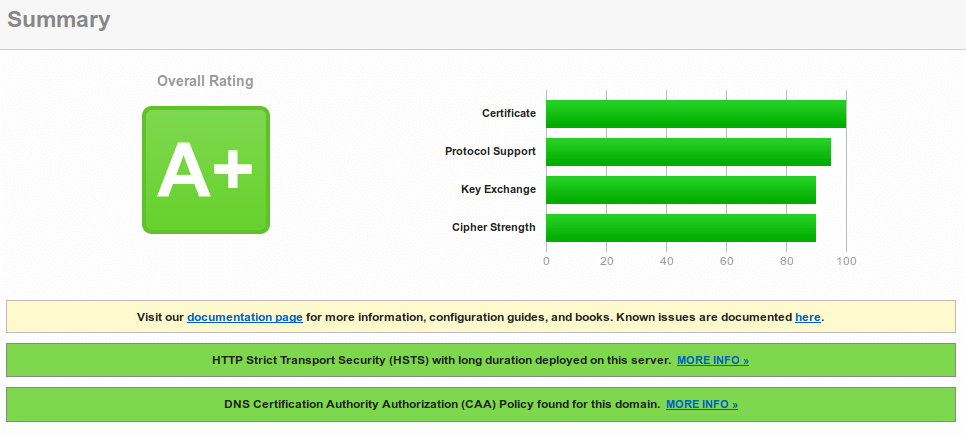
Test Your TLS Certificate
Go to ssllabs.com to test your TLS certificate and configuration. You should get A+ because HSTS is enabled.
Troubleshoot Login Error
If you log in with MariaDB root account, you may see the following error.
#1698 - Access denied for user 'root '@'localhost'
and
mysqli_real_connect(): (HY000/1698): Access denied for user 'root '@'localhost'
If you log in with user PHPMyAdmin, you won’t see the above error. However, user PHPMyAdmin can only be used to administer the PHPMyAdmin database. The cause of the error is that by default MariaDB root user is authenticated via the unix_socket plugin, instead of using the mysql_native_password plugin. To get around this issue, we can create another admin user and grant all privileges to the new admin user.
Log into MariaDB server from the command line.
sudo mariadb -u root
Create an admin user with password authentication.
CREATE USER 'admin' IDENTIFIED BY 'your-password';
Grant all privileges on all databases.
GRANT ALL PRIVILEGES ON *.* TO 'admin'@'%';
Flush privileges and exit;
flush privileges;
exit;
Now you can log into PHPMyAdmin with the admin account and manage all databases.
Install Latest Stable Version of phpMyAdmin
Ubuntu 18.04 repository ships phpMyAdmin 4.6.6. You can check your phpMyAdmin version if you click on top right home icon and then look on the left panel under phpMyAdmin.
Visit the phpMyAdmin download page and look for the .tar.gz URL and download it using wget. In this guide, we are using version 5.1.3 If a later version is now available, make sure to change the URL below to match (and let me know in the comments so I can update the guide 😉).
cd /tmp/
wget https://files.phpmyadmin.net/phpMyAdmin/5.1.3/phpMyAdmin-5.1.3-all-languages.zip
Then extract it.
sudo apt install unzip

unzip phpMyAdmin-5.1.3-all-languages.zip
Back up original phpMyAdmin files.
sudo mv /usr/share/phpmyadmin /usr/share/phpmyadmin-original
Move phpMyadmin 5.1.3 to /usr/share/phpmyadmin/ directory.
sudo mv phpMyAdmin-5.1.3-all-languages /usr/share/phpmyadmin
Edit the vendor config file.
sudo nano /usr/share/phpmyadmin/libraries/vendor_config.php
Find the following line.
define('CONFIG_DIR', '');
Change it to
define('CONFIG_DIR', '/etc/phpmyadmin/');
Save and close the file. Then create the tmp folder to store cache files.
sudo mkdir /usr/share/phpmyadmin/tmp
Change user ownership and group ownership to www-data.
sudo chown www-data:www-data /usr/share/phpmyadmin/tmp
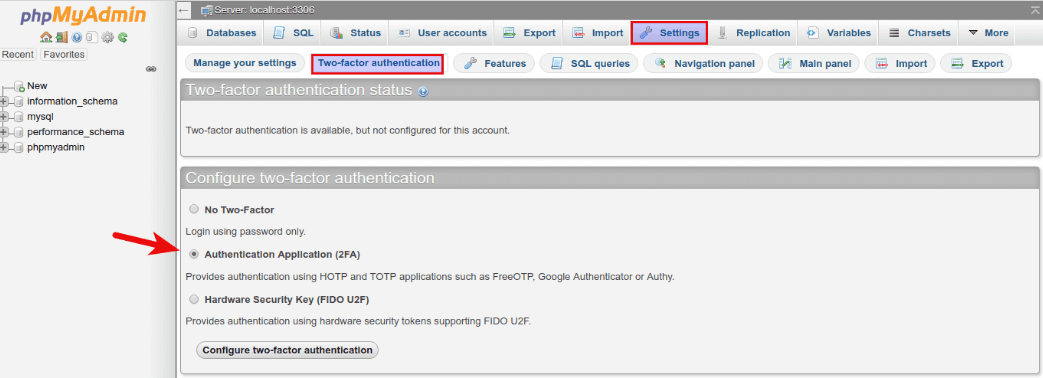
Enable Two-Factor Authentication
You can also harden phpMyAdmin by enabling two-factor authentication, which is a feature added in version 4.8. To enable it, log into phpMyAdmin. Then go to Settings -> Two-factor authentication and select Authentication application (2FA).
After clicking the Configure two-factor authentication button, you will be presented with a QR code, which you need to scan with a two-factor authentication app on your phone.
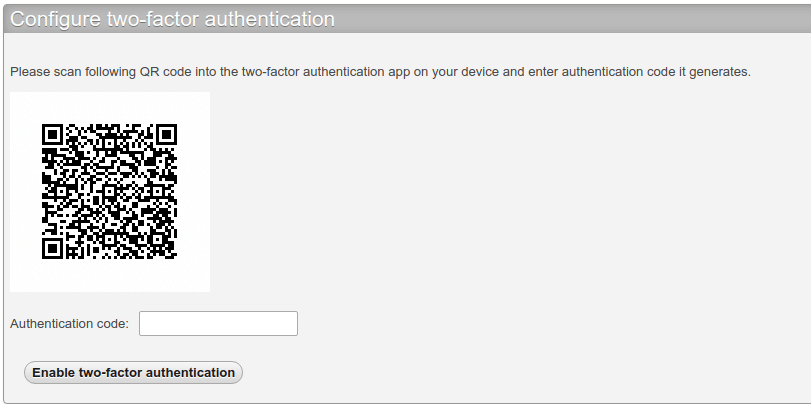
Google Authenticator is a popular 2FA app, but I recommend FreeOTP, which is an open-source 2FA app developed by Red Hat. Once you enter the authentication code generated by your 2FA app, two-factor authentication is enabled. If you now log out and log back in, you need to enter the authentication code in addition to username and password.

Certificate Auto Renewal
To automatically renew Let’s Encrypt certificate, simply edit root user’s crontab file.
sudo crontab -e
Then add the following line at the bottom.
@daily certbot renew --quiet && systemctl reload nginx
–quiet flag will suppress standard output. If you want to receive a standard error, then add the following line at the beginning of crontab file.
MAILTO=your-email-address
Reloading Nginx is needed for it to present the new certificate to clients.